


Deve's Technical Network
1947-1955 1st Chevy Trucks
216/235/261 Engine Solutions & More

"If I removed my distributor without marking where the rotor is pointed, then hit the starter or turned the engine, how do I put things back so my engine runs?"
In other words, how do you make sure your engine is properly timed when you don't know? If the engine is mostly unknown to you and it doesn't start, how do we make sure the engine is timed properly? The previous owner could have removed the Distributor and then put it back wrong, you just do not know. If you have questions about Stovebolt Engine timing, this procedure is for you!
This procedure assumes nothing other than the engine won't start and you suspect the timing is the issue. Leave the Distributor in if you can, but it's okay if it's already out.
First pull the valve cover. We are going to check the engine is properly timed without any information that would come from the Distributors orientation. Now, rotate the engine by hand. It’s easiest if you pull the spark plugs. We need to turn it at least two full revolutions. I know, it's hard to turn, the belt slips, yadda yadda. This is why I have my crank drilled and threaded for a 7/16" fine thread bolt, and it is extra security for holding the harmonic balancer on. With the plugs removed, you can turn the engine with that bolt with no issues. Barring that, just tighten the fan belt until you can rotate the engine by hand the hard way. (Again, take the plugs out first so you are not fighting compression.)
Now to explain what you are looking for...
The valves are timed in such a way as to open and close at just the right time. This is set in stone by the timing gear. If the valves are adjusted anywhere close,
the engine will run. We won't go into how to adjust the valves because that article is here and you can do that later.
 You are turning the engine watching the rocker arms rock up and down. Like an old oil derrick! There are two valves per cylinder or 12 of them. Starting from the
front they are positioned: Exhaust, Intake, Intake, Exhaust, Exhaust, Intake, Intake, Exhaust, Exhaust, Intake, Intake, Exhaust (see pic).
You are turning the engine watching the rocker arms rock up and down. Like an old oil derrick! There are two valves per cylinder or 12 of them. Starting from the
front they are positioned: Exhaust, Intake, Intake, Exhaust, Exhaust, Intake, Intake, Exhaust, Exhaust, Intake, Intake, Exhaust (see pic).
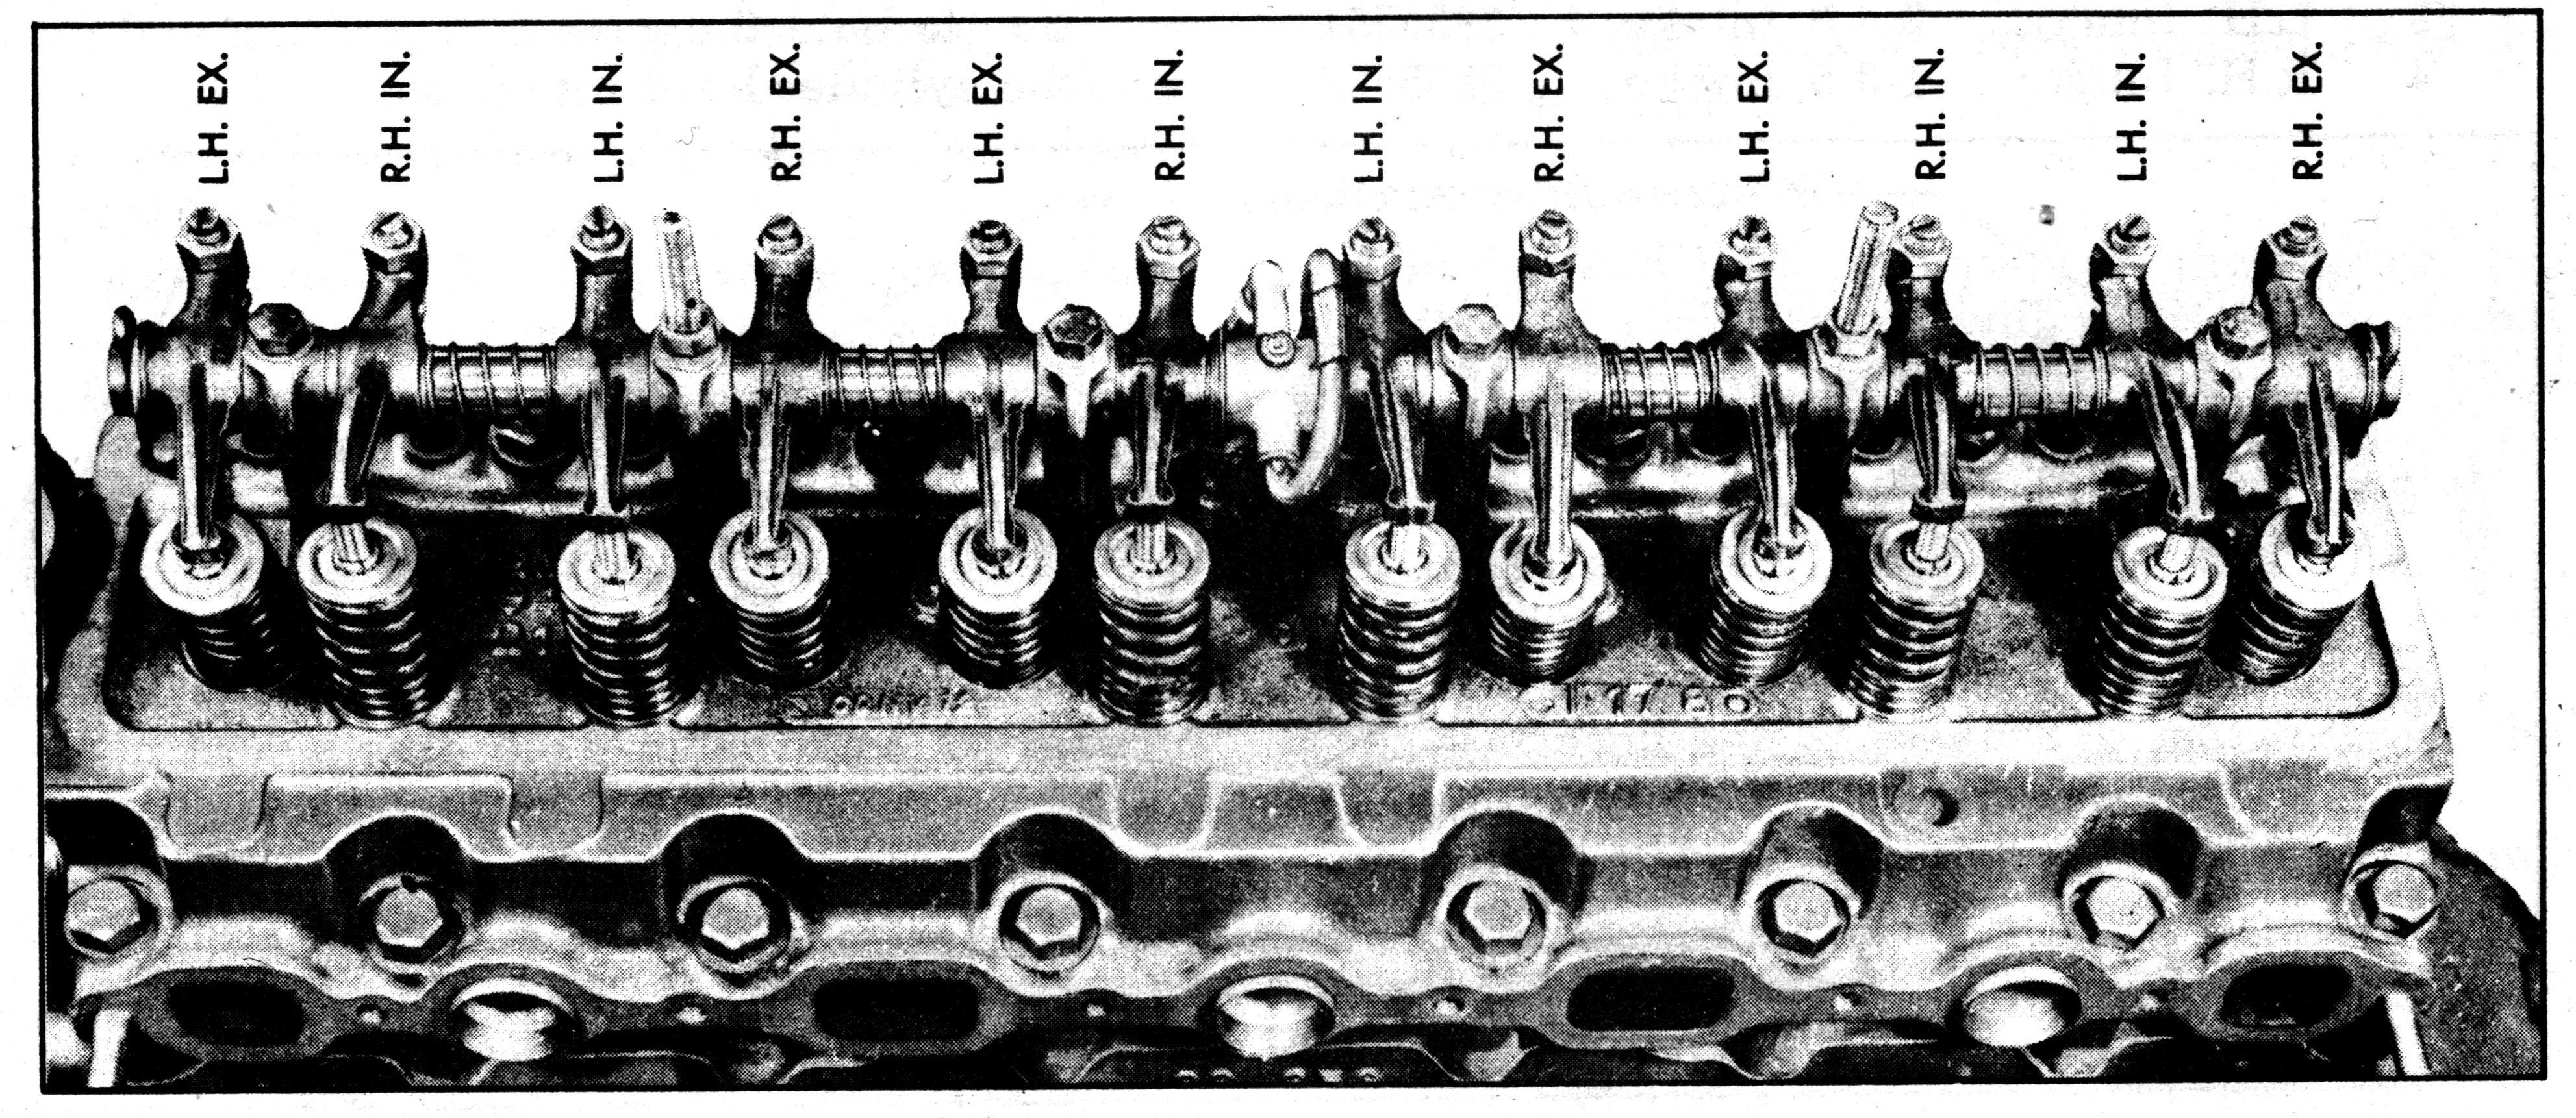 At this point we only care about the valves of #6 (the two rear ones). Turn the engine until it is #6's turn for the valves to start moving. Watch carefully or
you will miss it. Slowly turn the engine until you see #6 intake rocker start moving and #6 intake spring compress. Continue turning until that intake valve comes
back up. At this point you will see the exhaust rocker start moving. At this point where the intake valve just closes and the exhaust rocker starts to move,
that is TDC. This also represents #1's valves are in Firing Position because they are not rocking, meaning they are on the back side (or base circle) of the Cam.
At this point we only care about the valves of #6 (the two rear ones). Turn the engine until it is #6's turn for the valves to start moving. Watch carefully or
you will miss it. Slowly turn the engine until you see #6 intake rocker start moving and #6 intake spring compress. Continue turning until that intake valve comes
back up. At this point you will see the exhaust rocker start moving. At this point where the intake valve just closes and the exhaust rocker starts to move,
that is TDC. This also represents #1's valves are in Firing Position because they are not rocking, meaning they are on the back side (or base circle) of the Cam.
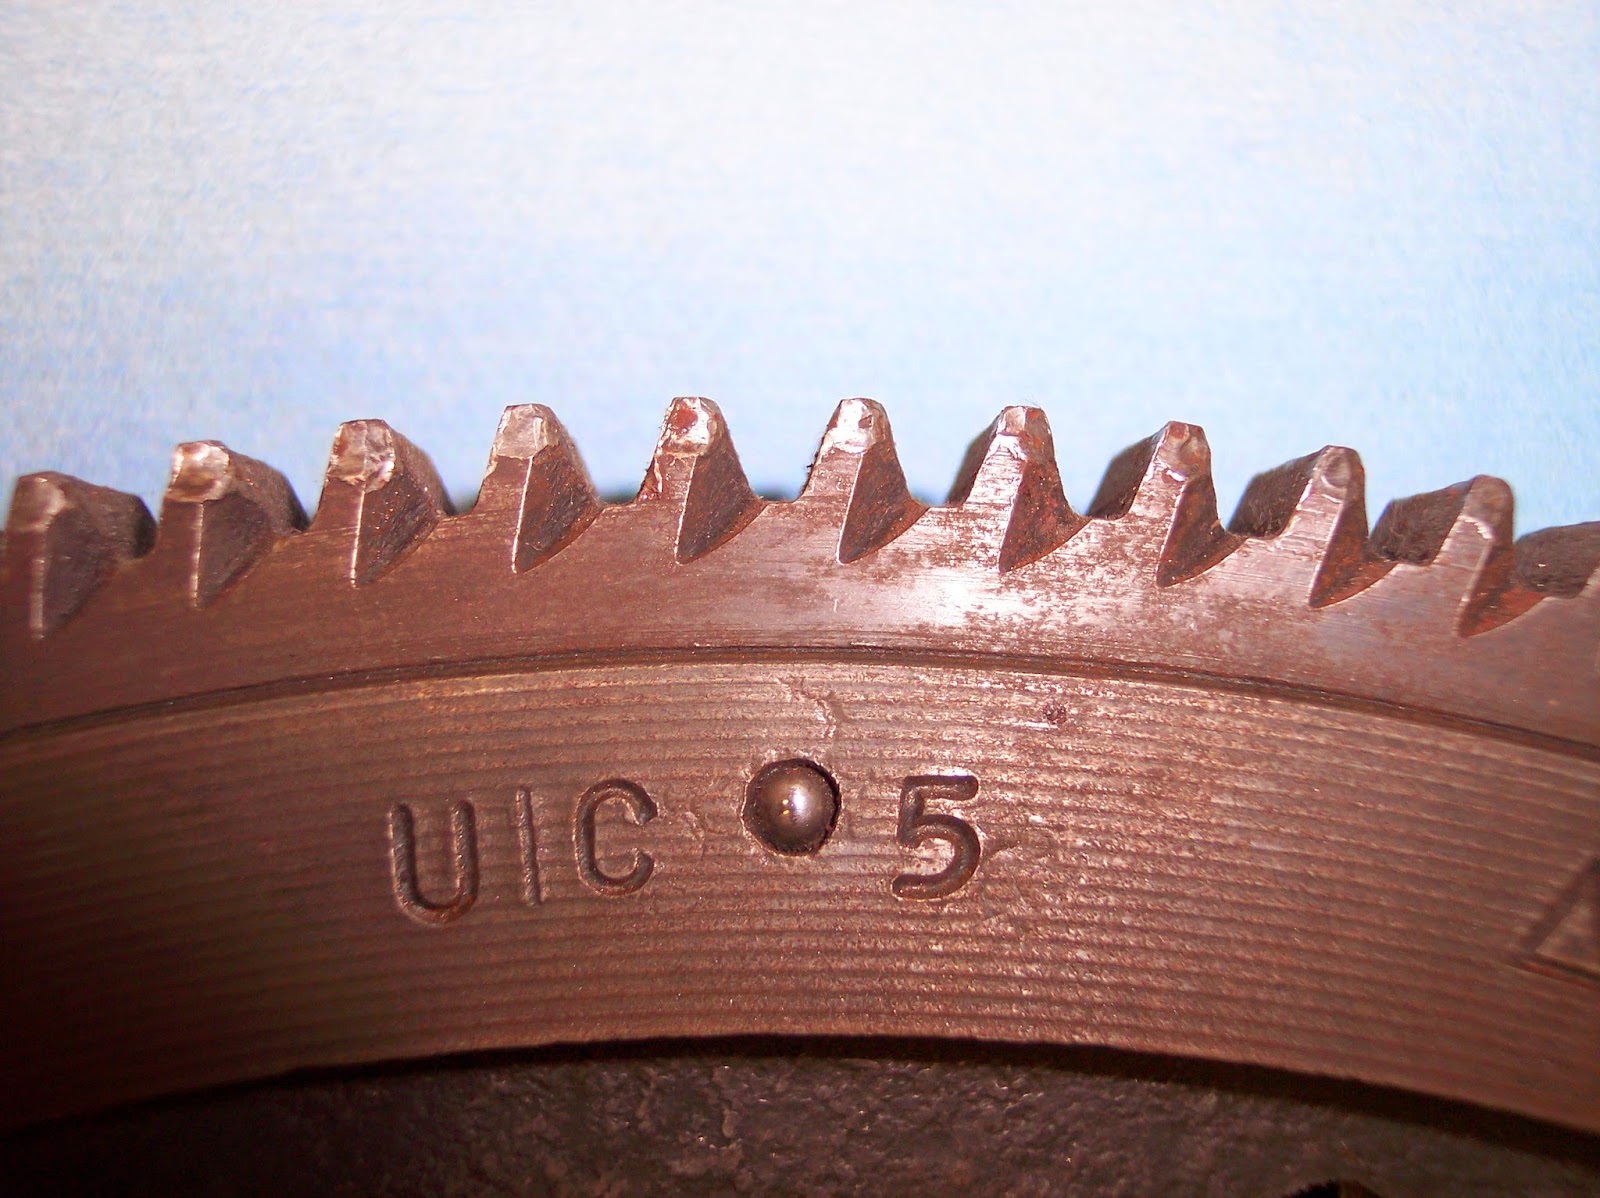
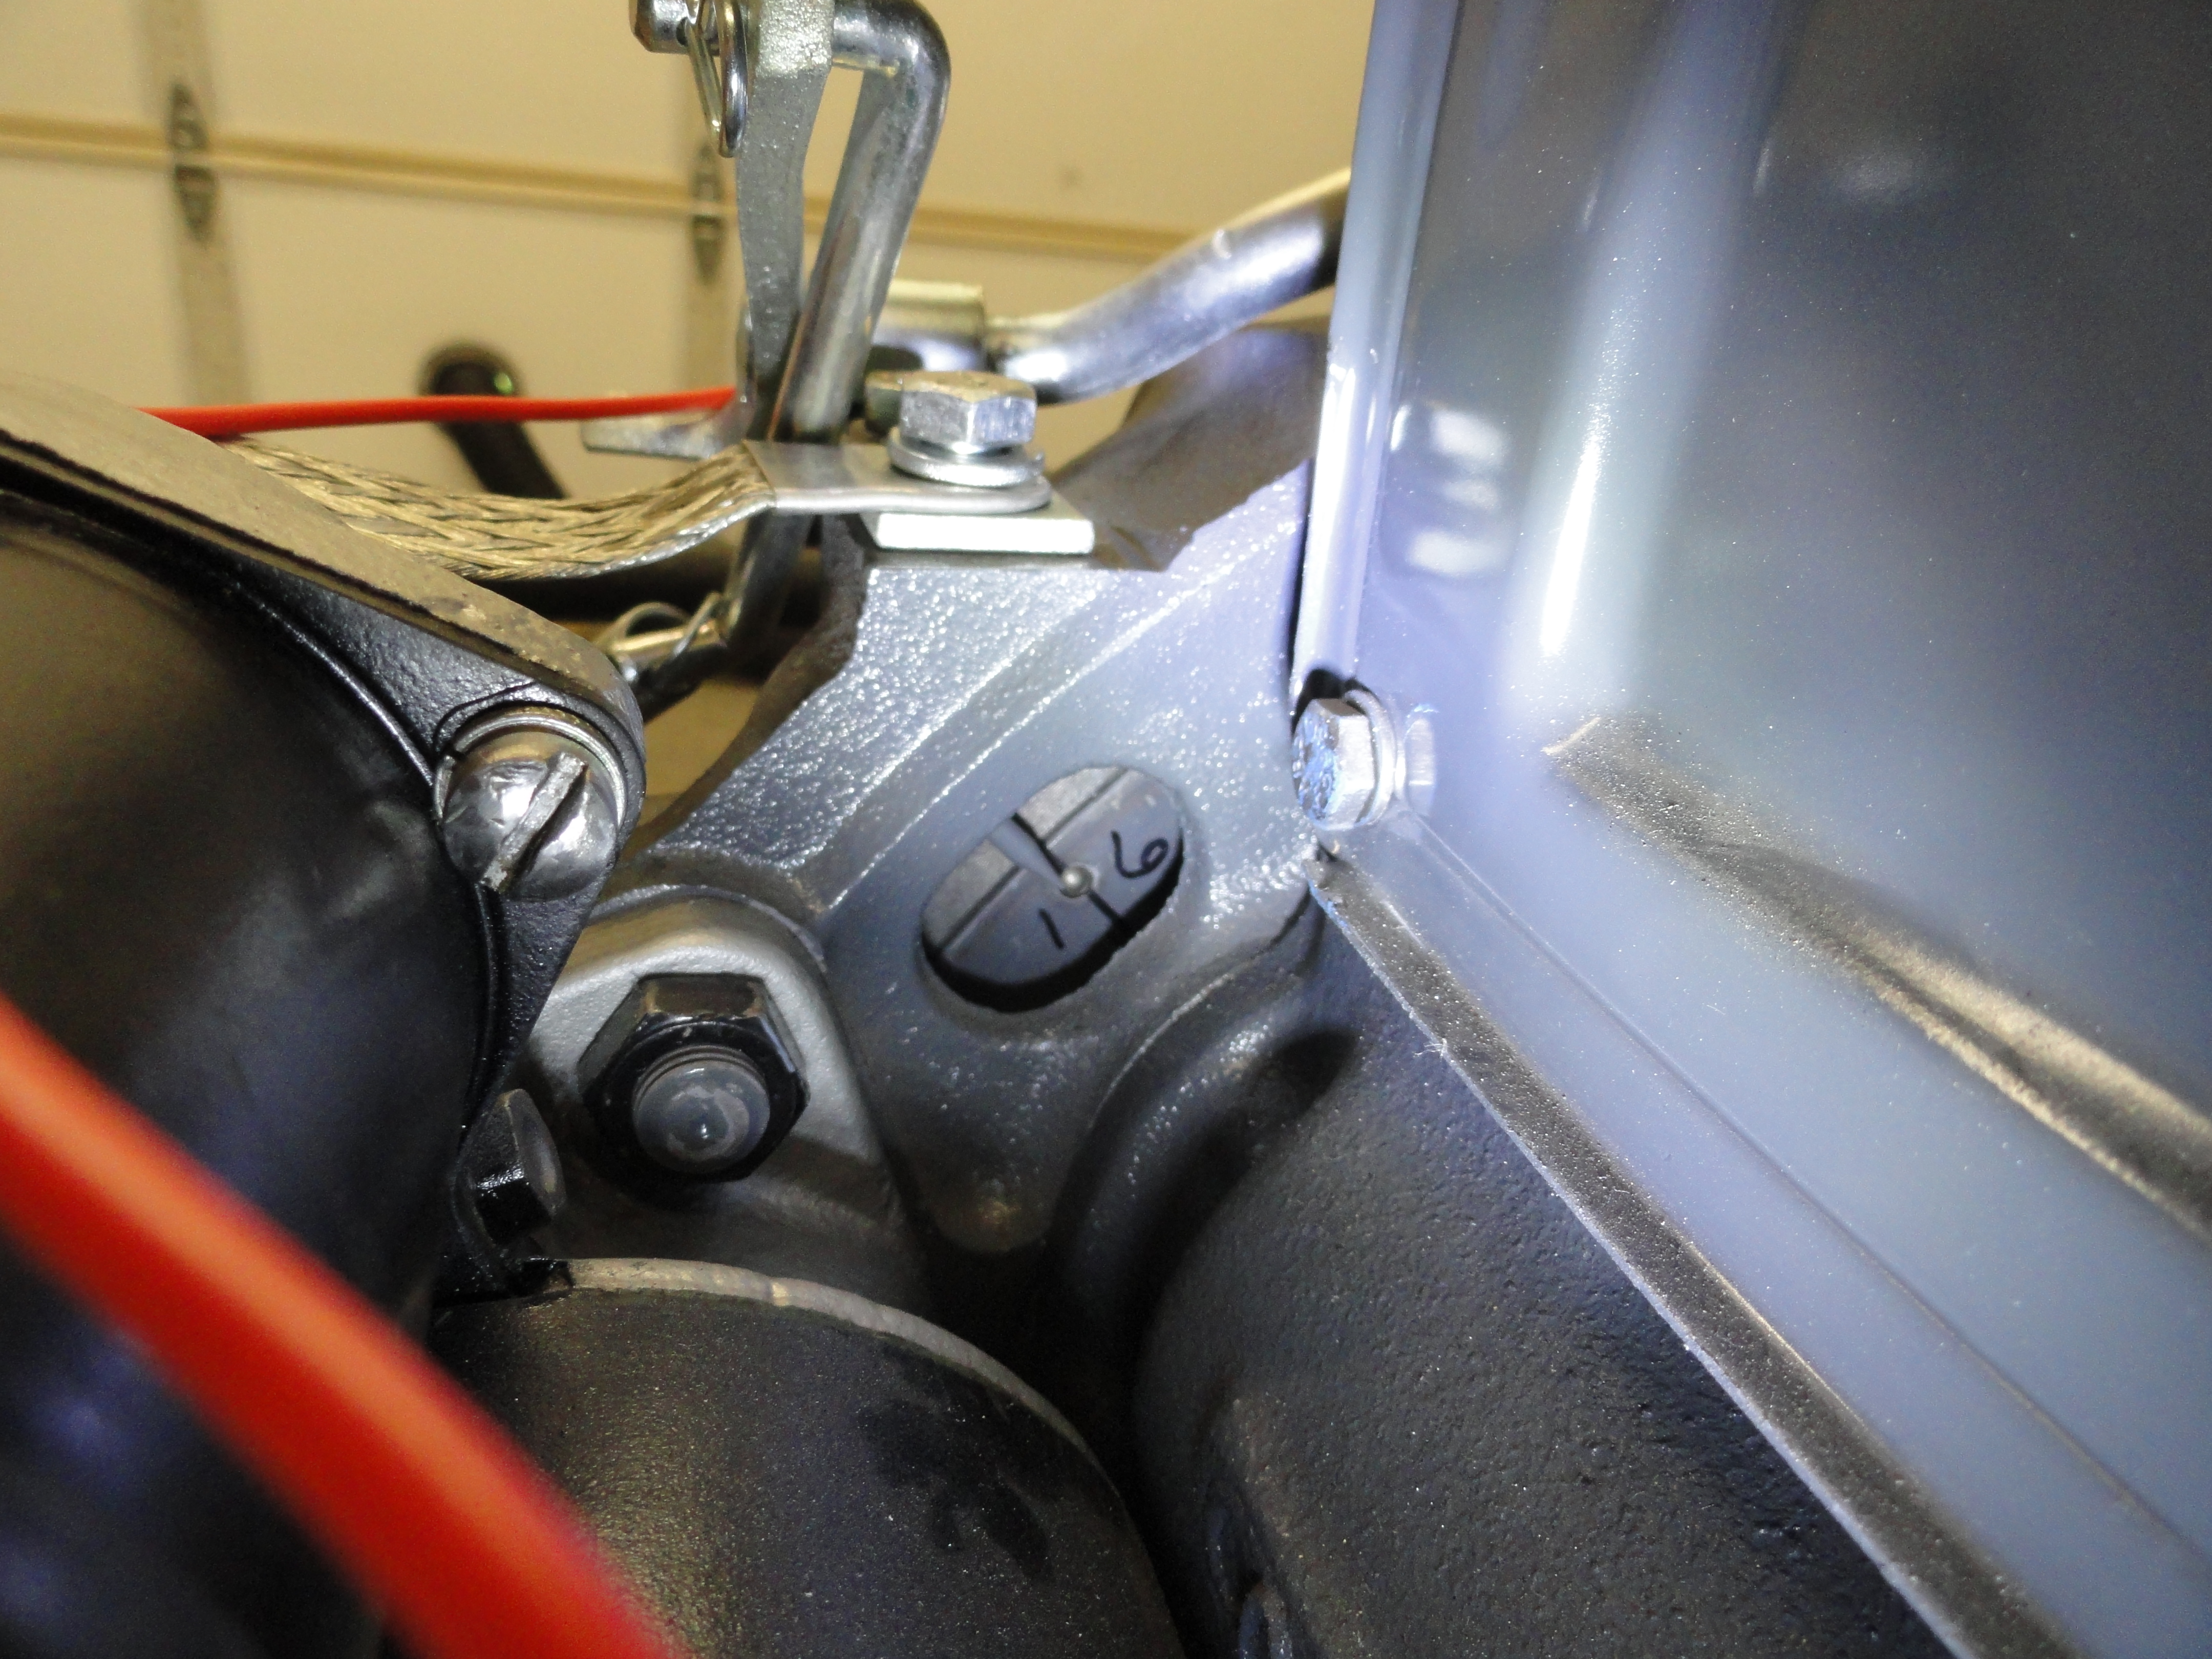
 At this point rotate the engine back and forth and watch #6's Valves rock, stop in the middle of that process and go take a look at your flywheel markings by viewing through
that hole above the starter. In most flywheels there is a BB (Ball Bearing) embedded in the face, but not all. The majority of the GM flywheels are made with an embedded
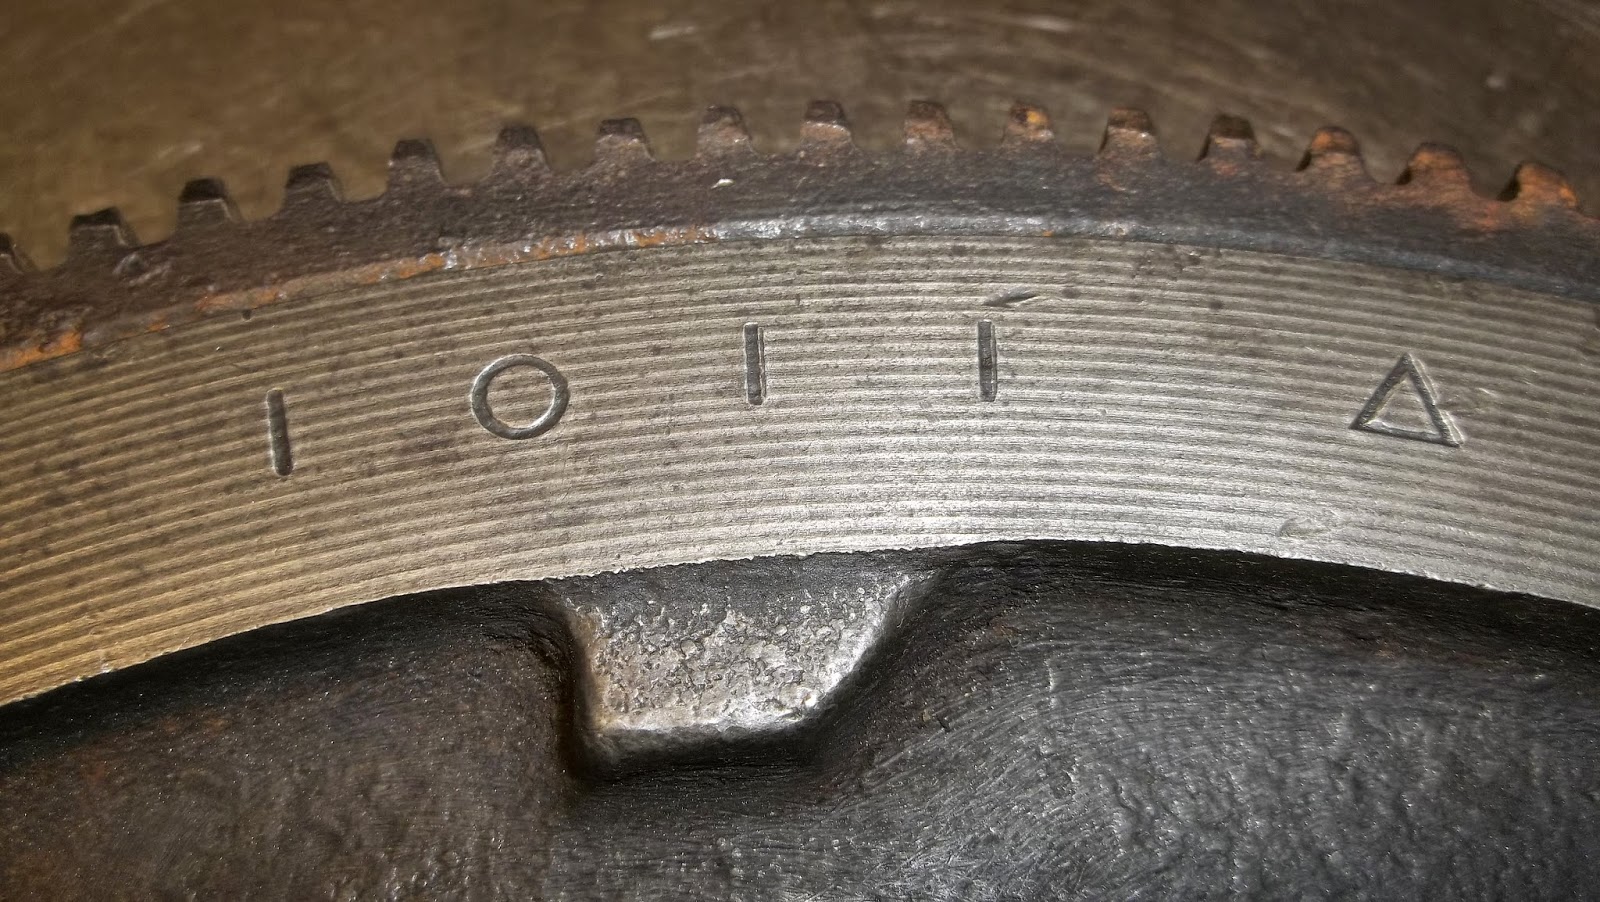
ball bearing and have a 5 after it denoting 5 degrees before Top Dead Center (pic left). Some flywheels have no ball bearing but are clearly marked with hash marks
at TDC (the O mark) 5 degrees after (left of TDC) and 5 and 10 before TDC (pic right).
At this point rotate the engine back and forth and watch #6's Valves rock, stop in the middle of that process and go take a look at your flywheel markings by viewing through
that hole above the starter. In most flywheels there is a BB (Ball Bearing) embedded in the face, but not all. The majority of the GM flywheels are made with an embedded
ball bearing and have a 5 after it denoting 5 degrees before Top Dead Center (pic left). Some flywheels have no ball bearing but are clearly marked with hash marks
at TDC (the O mark) 5 degrees after (left of TDC) and 5 and 10 before TDC (pic right).
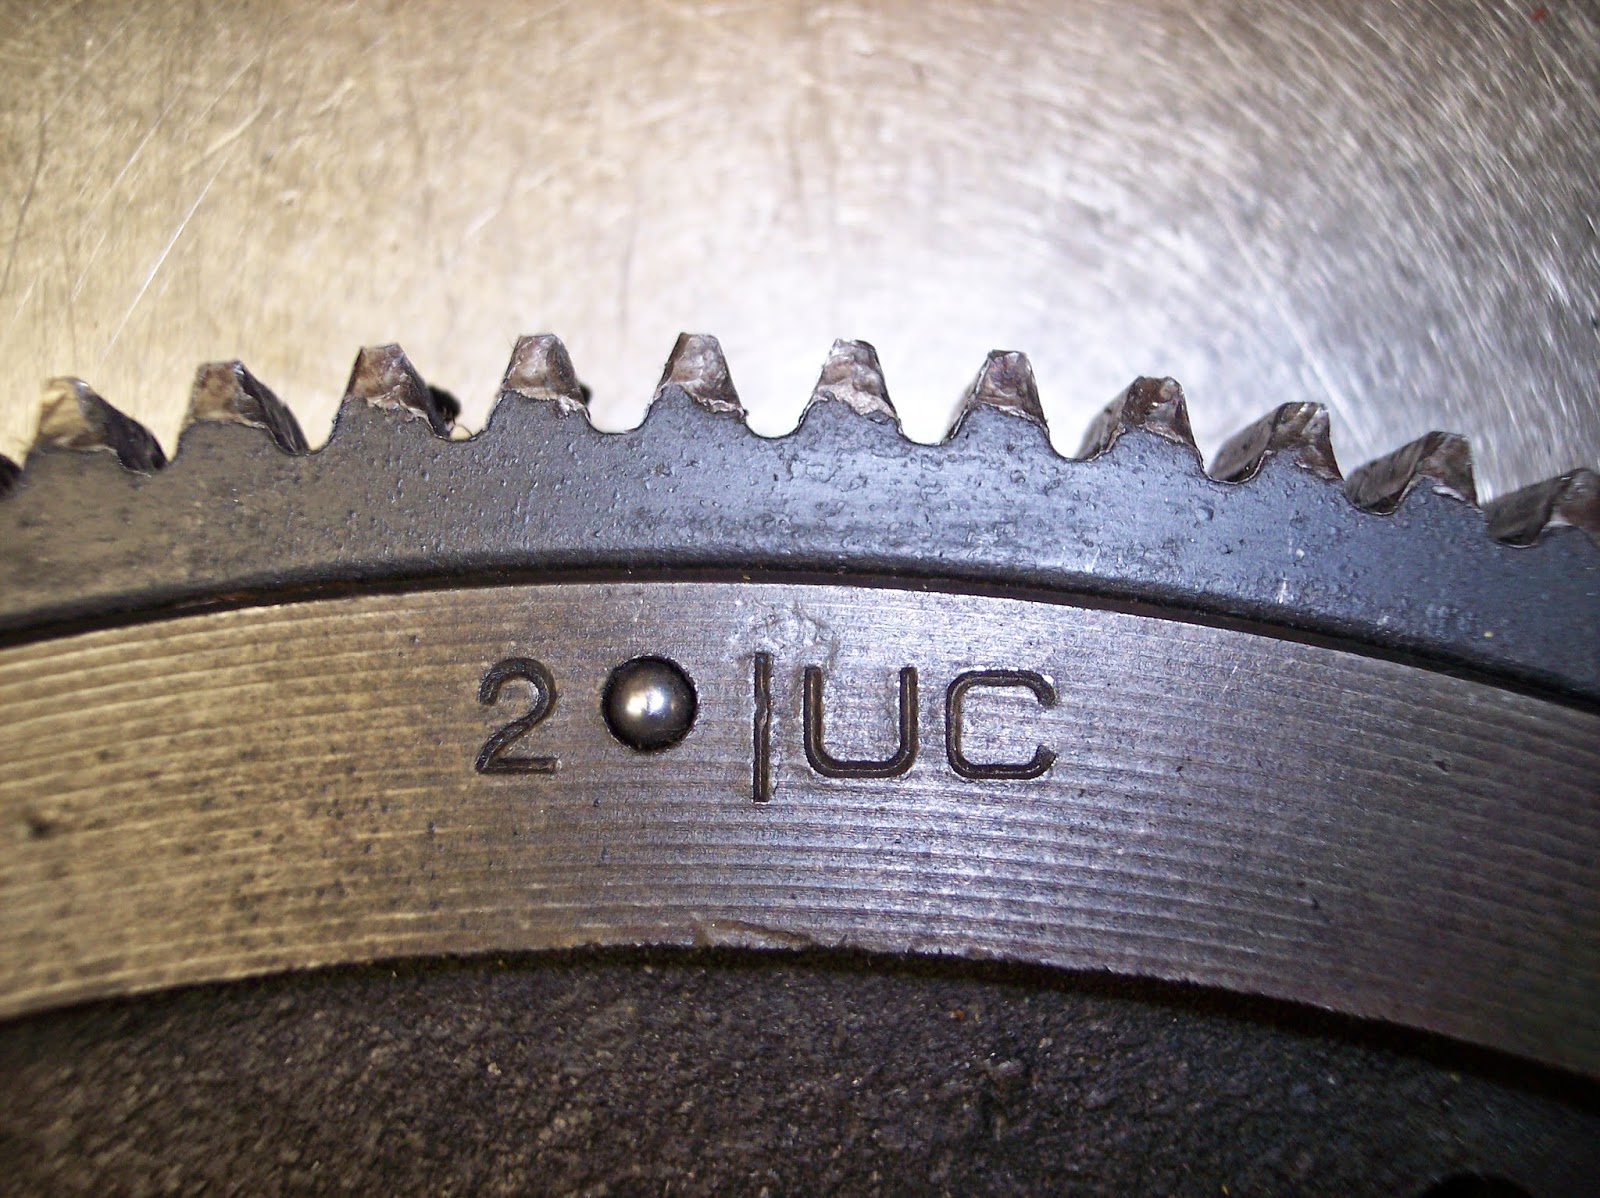 From time to time you may see a flywheel with a BB at 2 degrees After TDC. Although uncommon. No matter which flywheel you have, 5 degrees before TDC is roughly where the
engine runs best. U|C is what GM termed as Upper Center but nowadays we call it Top Dead Center. Do not call me telling me these markings do not exist in your stock flywheel,
rather get out the Simple Green and start cleaning! :) For much more information on Flywheels and it's very informative, that article is here.
From time to time you may see a flywheel with a BB at 2 degrees After TDC. Although uncommon. No matter which flywheel you have, 5 degrees before TDC is roughly where the
engine runs best. U|C is what GM termed as Upper Center but nowadays we call it Top Dead Center. Do not call me telling me these markings do not exist in your stock flywheel,
rather get out the Simple Green and start cleaning! :) For much more information on Flywheels and it's very informative, that article is here.
Now if you stopped the rocking action on #6 perfectly, the U|C marking should be in that window above the Starter. I never get it exactly perfect myself, but rotate the
engine a few degrees forwards and backwards and you will see it.
Okay, so you have the valves rocking on #6 and you see the U|C marking on the flywheel in the window above the starter. NOW is when we go two different ways with
this article...
Scenario ONE: YOUR DISTRIBUTOR IS INSTALLED PROPERLY (Let's find out)
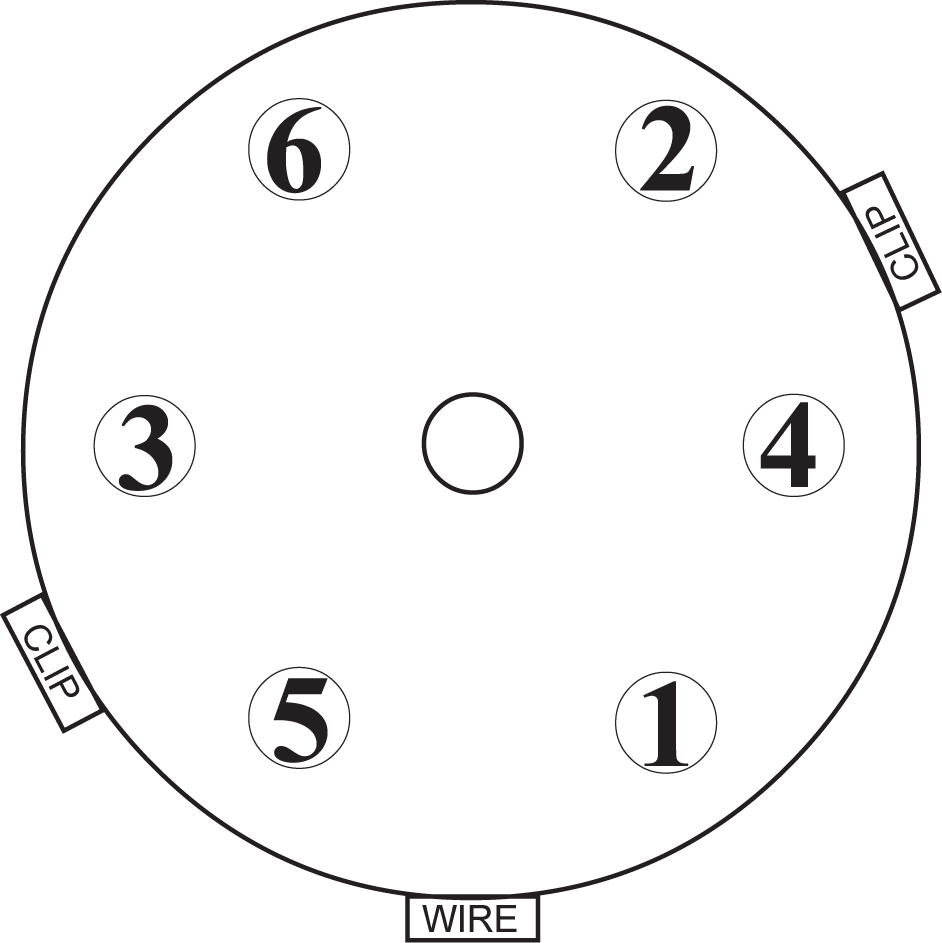
Pop the cap and see where the rotor is pointing. It should be pointing to the #1 Spark Plug's Plug Wire. If it is a little off, that makes sense because the engine runs
best at 5 degrees Before Top Dead Center (where the BB is on the flywheel). If that checks out and you have the wires sequenced properly to 1-5-3-6-2-4 (clockwise
around the cap), then your engine should run fine.
Scenario TWO: YOUR DISTRIBUTOR IS OUT
 I get on average two calls a month on this. “How do I put my Distributor back in? Every time I try, the darn thing rotates away from #1! This is driving me crazy!"
(this is YOU talking) So, the gear on the end of your Distributor is not there for pretty. It is THE sole and ONLY thing that spins your Distributor and oil pump. If you
do not ensure the Distributor is ALL the way down, you will not get any oil pressure. I have seen where the rotor is turning and there is STILL no oil pressure because it is not
COMPLETELY down. Check oil pressure right away after installing a Distributor.
I get on average two calls a month on this. “How do I put my Distributor back in? Every time I try, the darn thing rotates away from #1! This is driving me crazy!"
(this is YOU talking) So, the gear on the end of your Distributor is not there for pretty. It is THE sole and ONLY thing that spins your Distributor and oil pump. If you
do not ensure the Distributor is ALL the way down, you will not get any oil pressure. I have seen where the rotor is turning and there is STILL no oil pressure because it is not
COMPLETELY down. Check oil pressure right away after installing a Distributor.
If the Distributor does not go all the way in, the problem is most likely the oil pump drive on the bottom end of the Distributor shaft (tang) is not seated in the oil pump.
There is a slot in the top of the oil pump shaft, which is in the very bottom of the hole the distributor goes in. That slot never seems to be turned in the proper position
for the distributor tang.
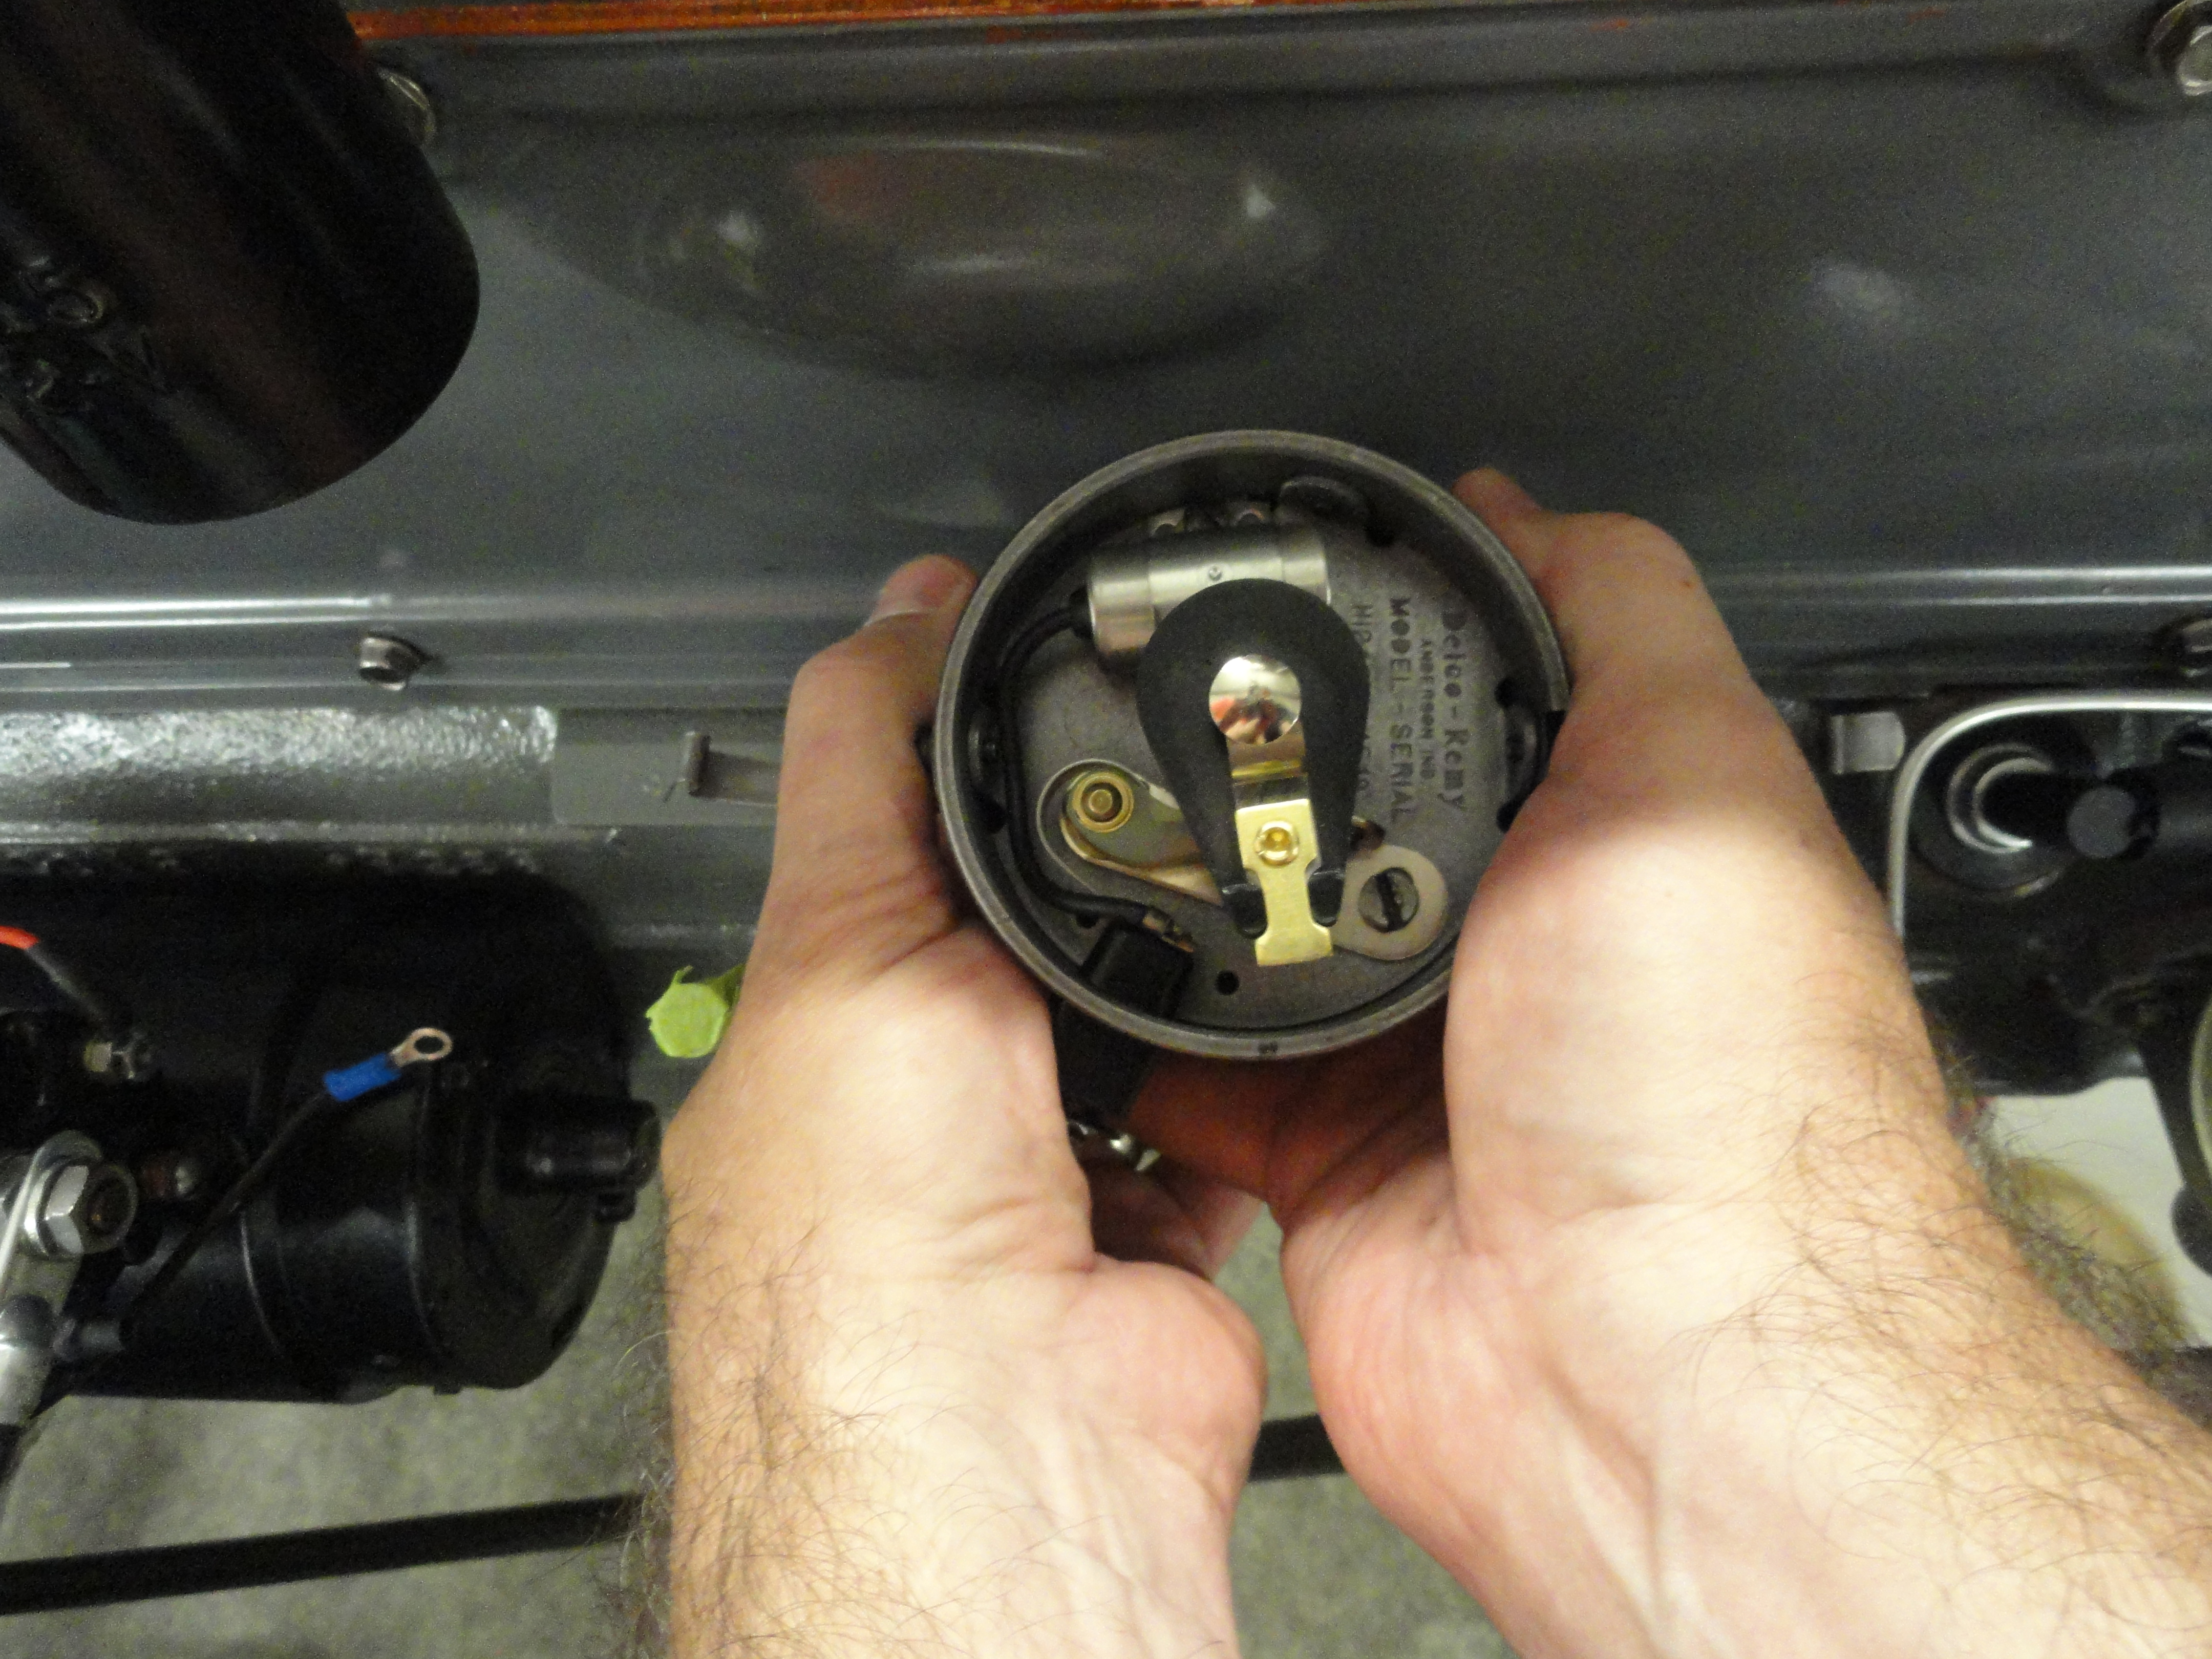
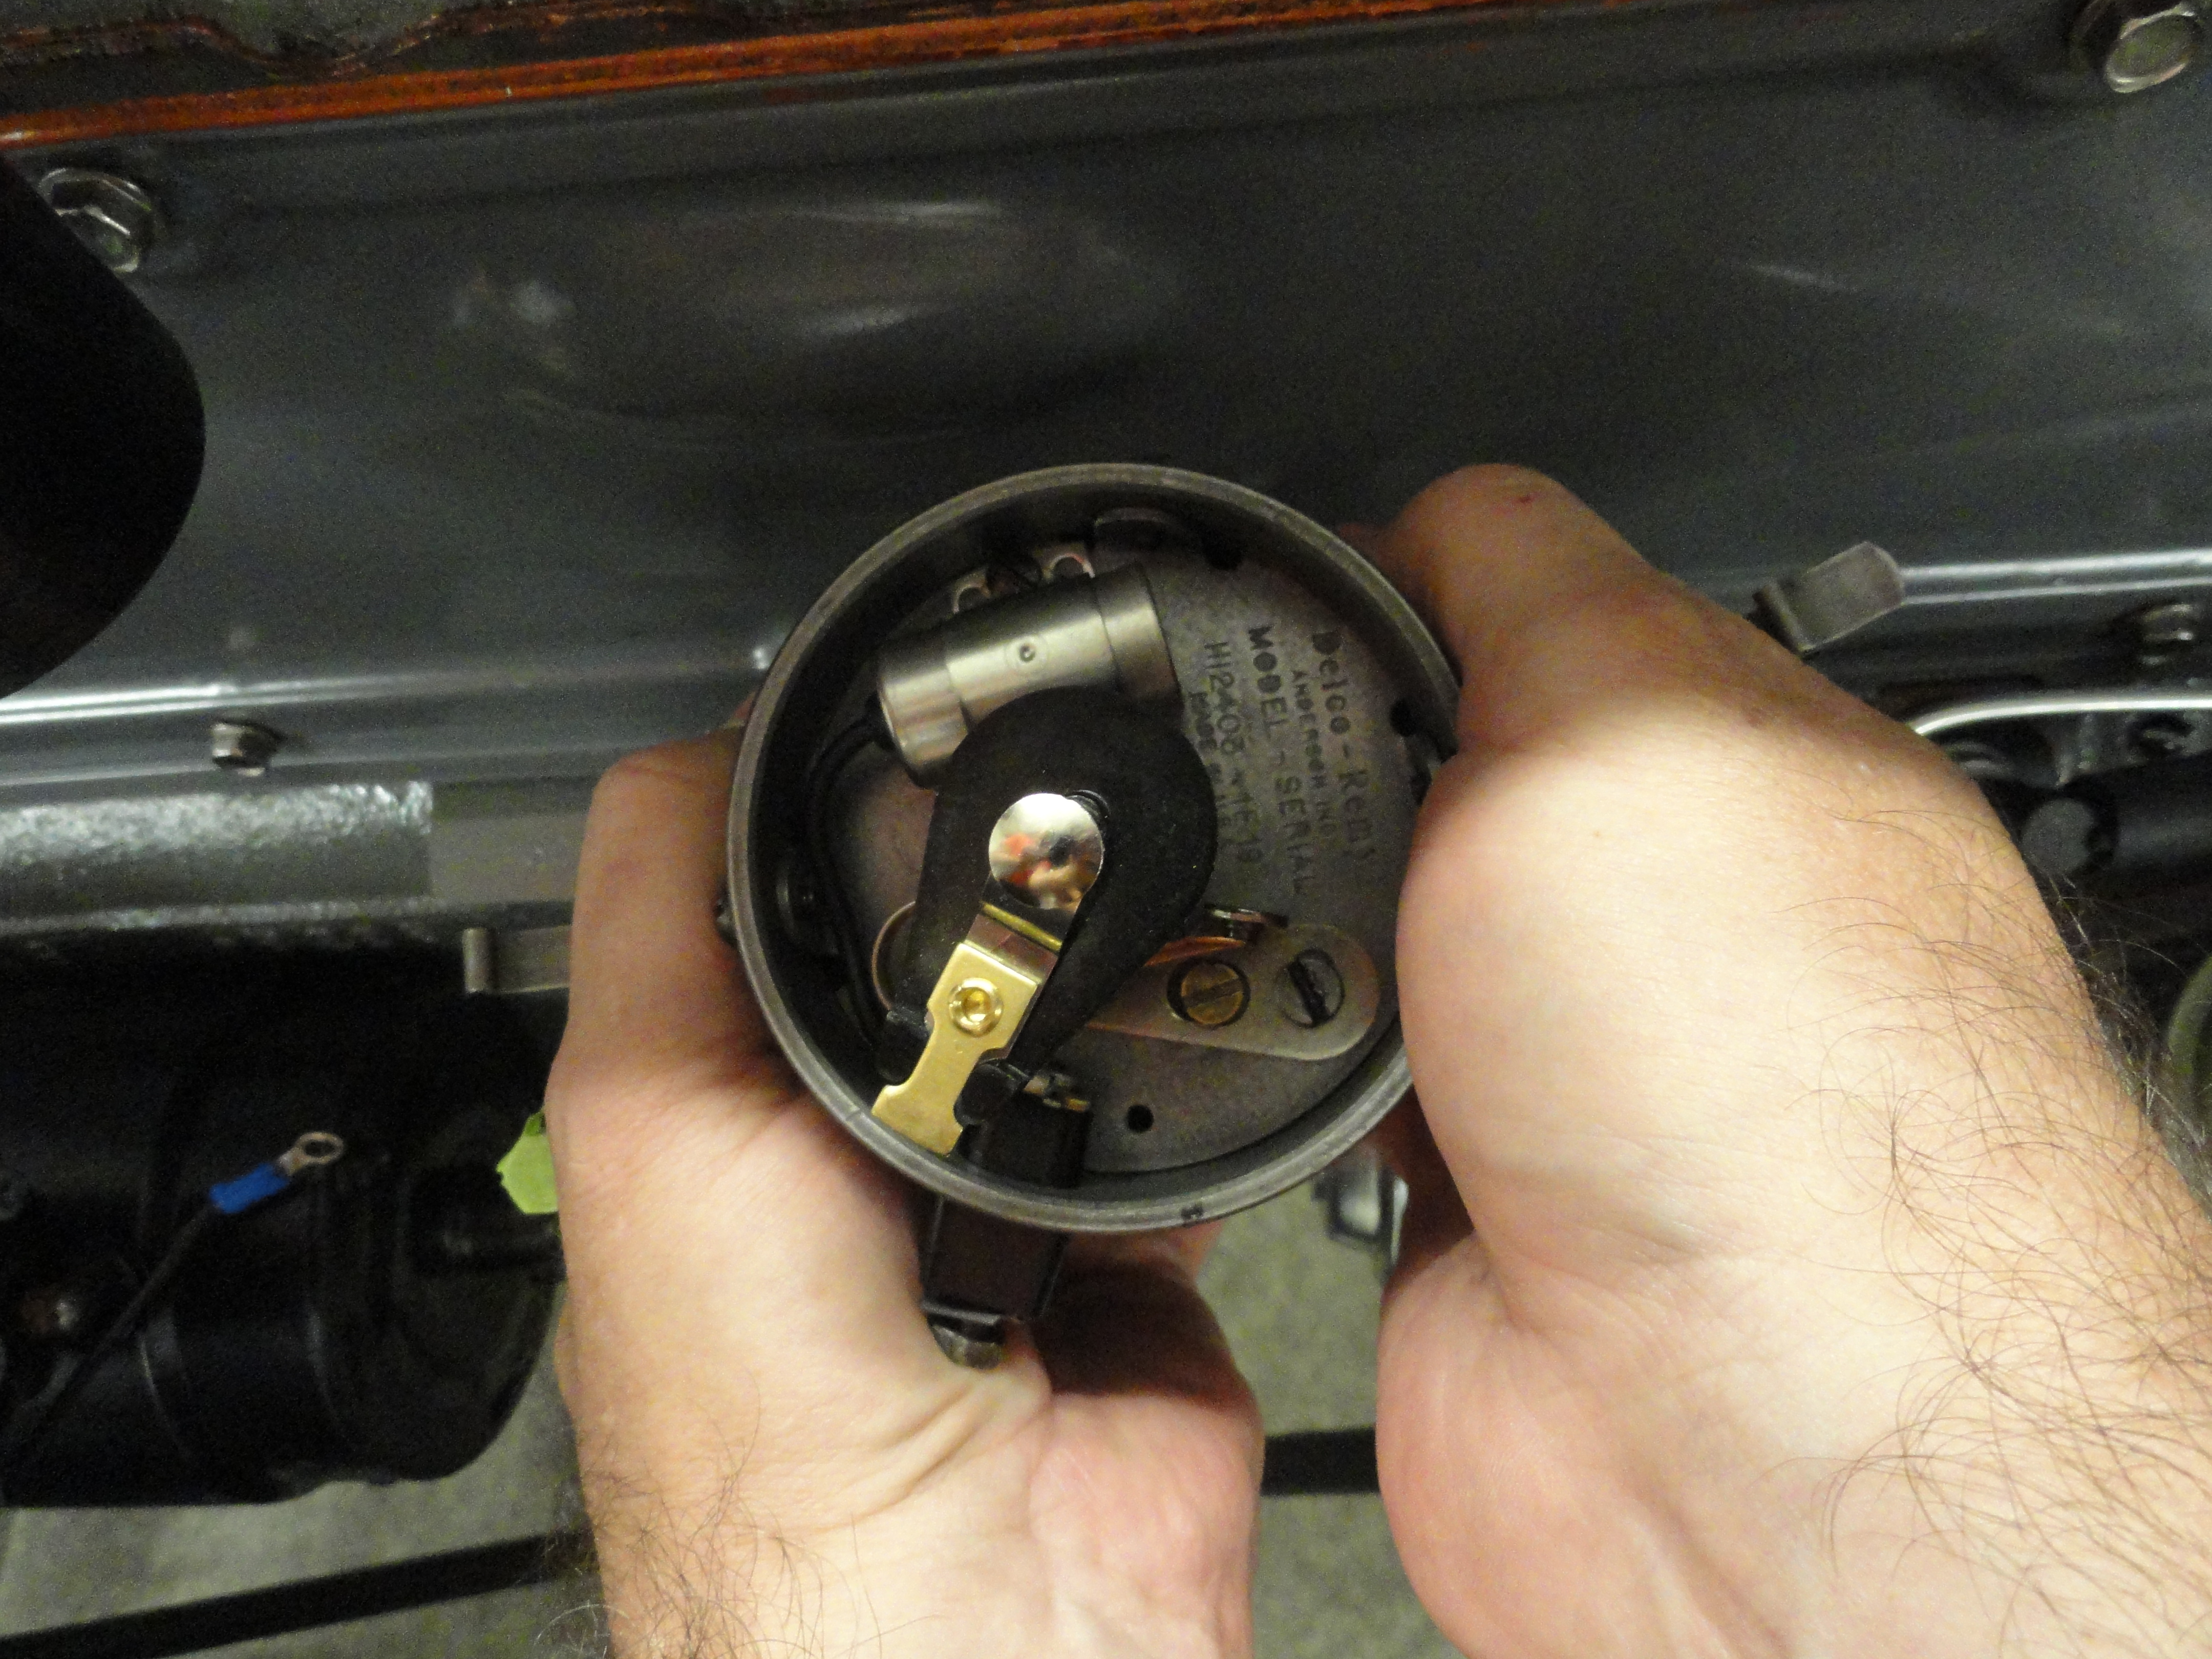
Since the Distributor's slot is pointed the same direction as the rotor, All you have to do when removing the Distributor is mark on the edge of it where the rotor ends up
after removing it. A scratch or mark on the edge of the Distributor Housing will do. Be precise! Then you can turn the distributor shaft all day and not worry. When you
reinstall the Distributor, simply go in there with a large screwdriver and turn the oil pump slot to about 6: or 6:30 o'clock. Somewhere in there, and try to drop the
Distributor in. The reason for it not being at 8 o'clock is because the distributor gear will turn the distributor as it engages against the cam gear before it
reaches the oil pump slot.
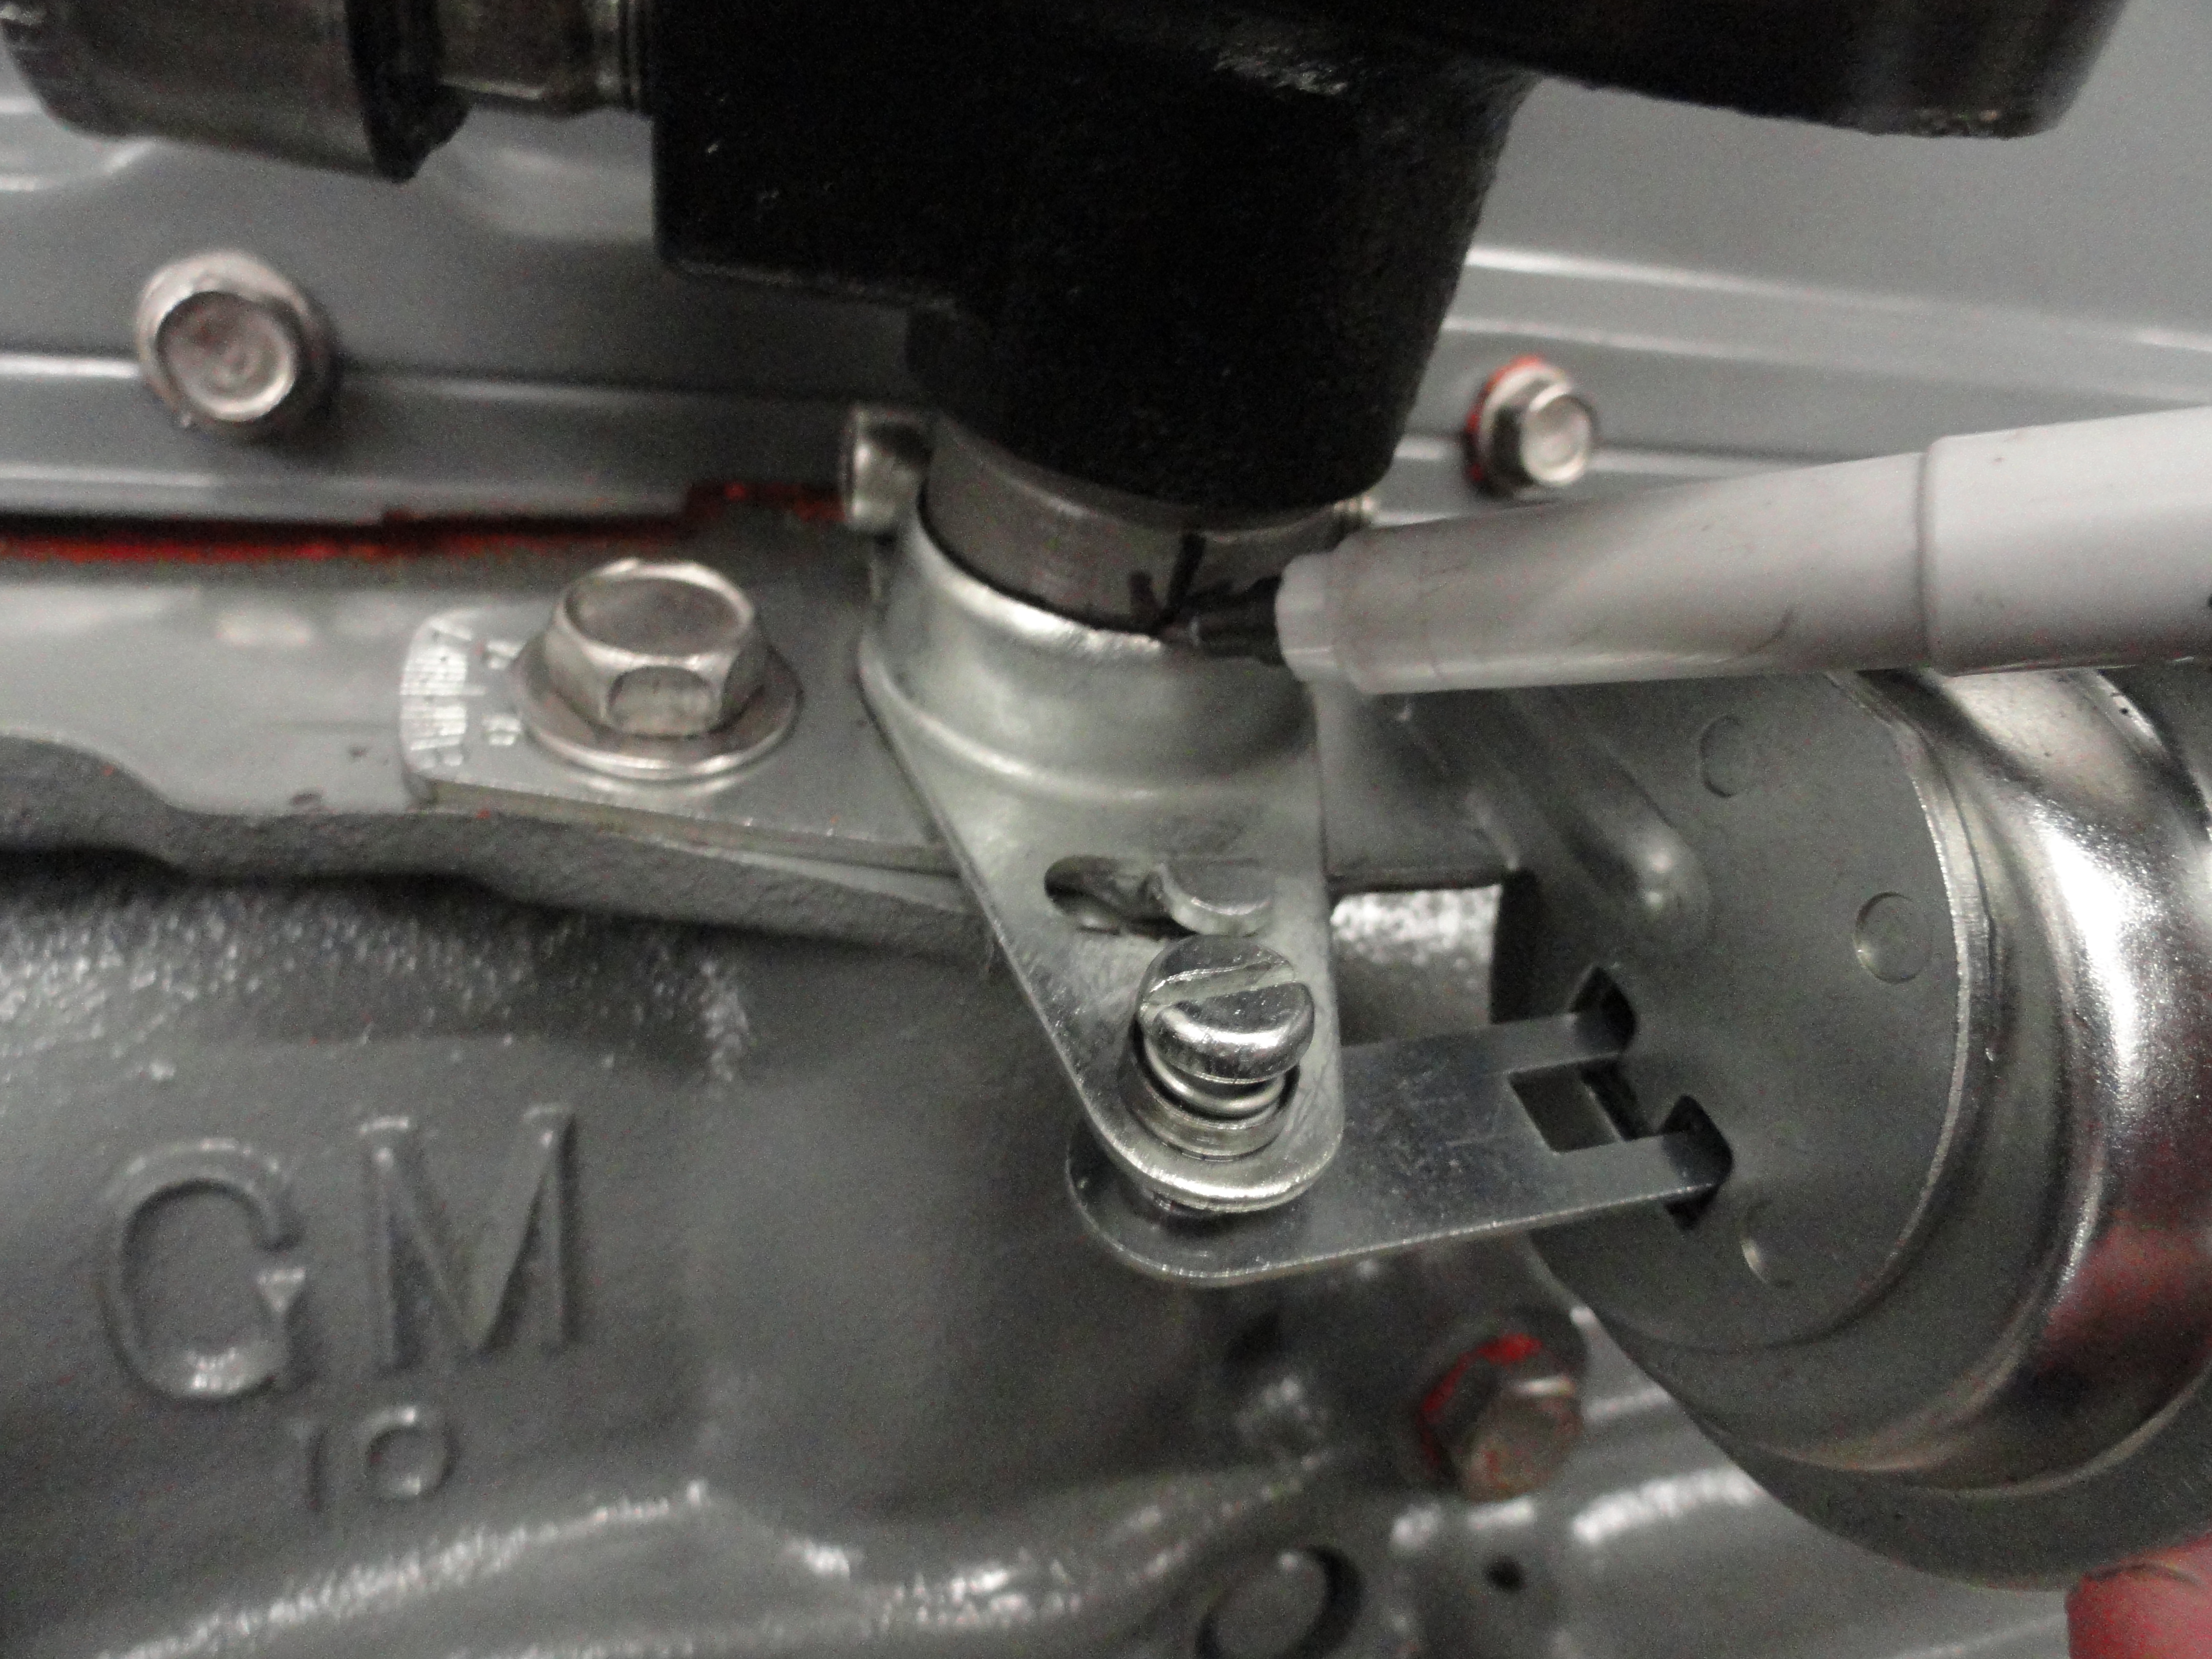 What I like to do before I remove the distributor is make a mark horizontally above the vacuum advance bracket on the distributor shaft. No need to take the vacuum advance
off with the distributor. The only screw that you need to remove the distributor is that sideways one along the back. Loosen that one and the distributor will come right out.
No need to ever remove the vacuum Advance unless you are putting in a new one.
What I like to do before I remove the distributor is make a mark horizontally above the vacuum advance bracket on the distributor shaft. No need to take the vacuum advance
off with the distributor. The only screw that you need to remove the distributor is that sideways one along the back. Loosen that one and the distributor will come right out.
No need to ever remove the vacuum Advance unless you are putting in a new one.
If you did the above right, your Distributor's rotor is pointing toward the #1 plug wire when the BB is in the middle of the window above the starter. This is important to
remember...
IF YOU CAN'T GET IT DOWN ALL THE WAY, and there is no obstructions, then you are not getting that oil slot turned correctly at the bottom of the hole. Just keep trying
until you get it. You are very VERY close with the above instruction.
Now that the distributor is all the way down, and the UC or BB is showing on the flywheel, turn the Distributor housing counterclockwise just enough so you see the points
just getting ready to open (a test light works well to show when the points just start to open). At this point the rotor should still be pointing at #1 wire on the cap.
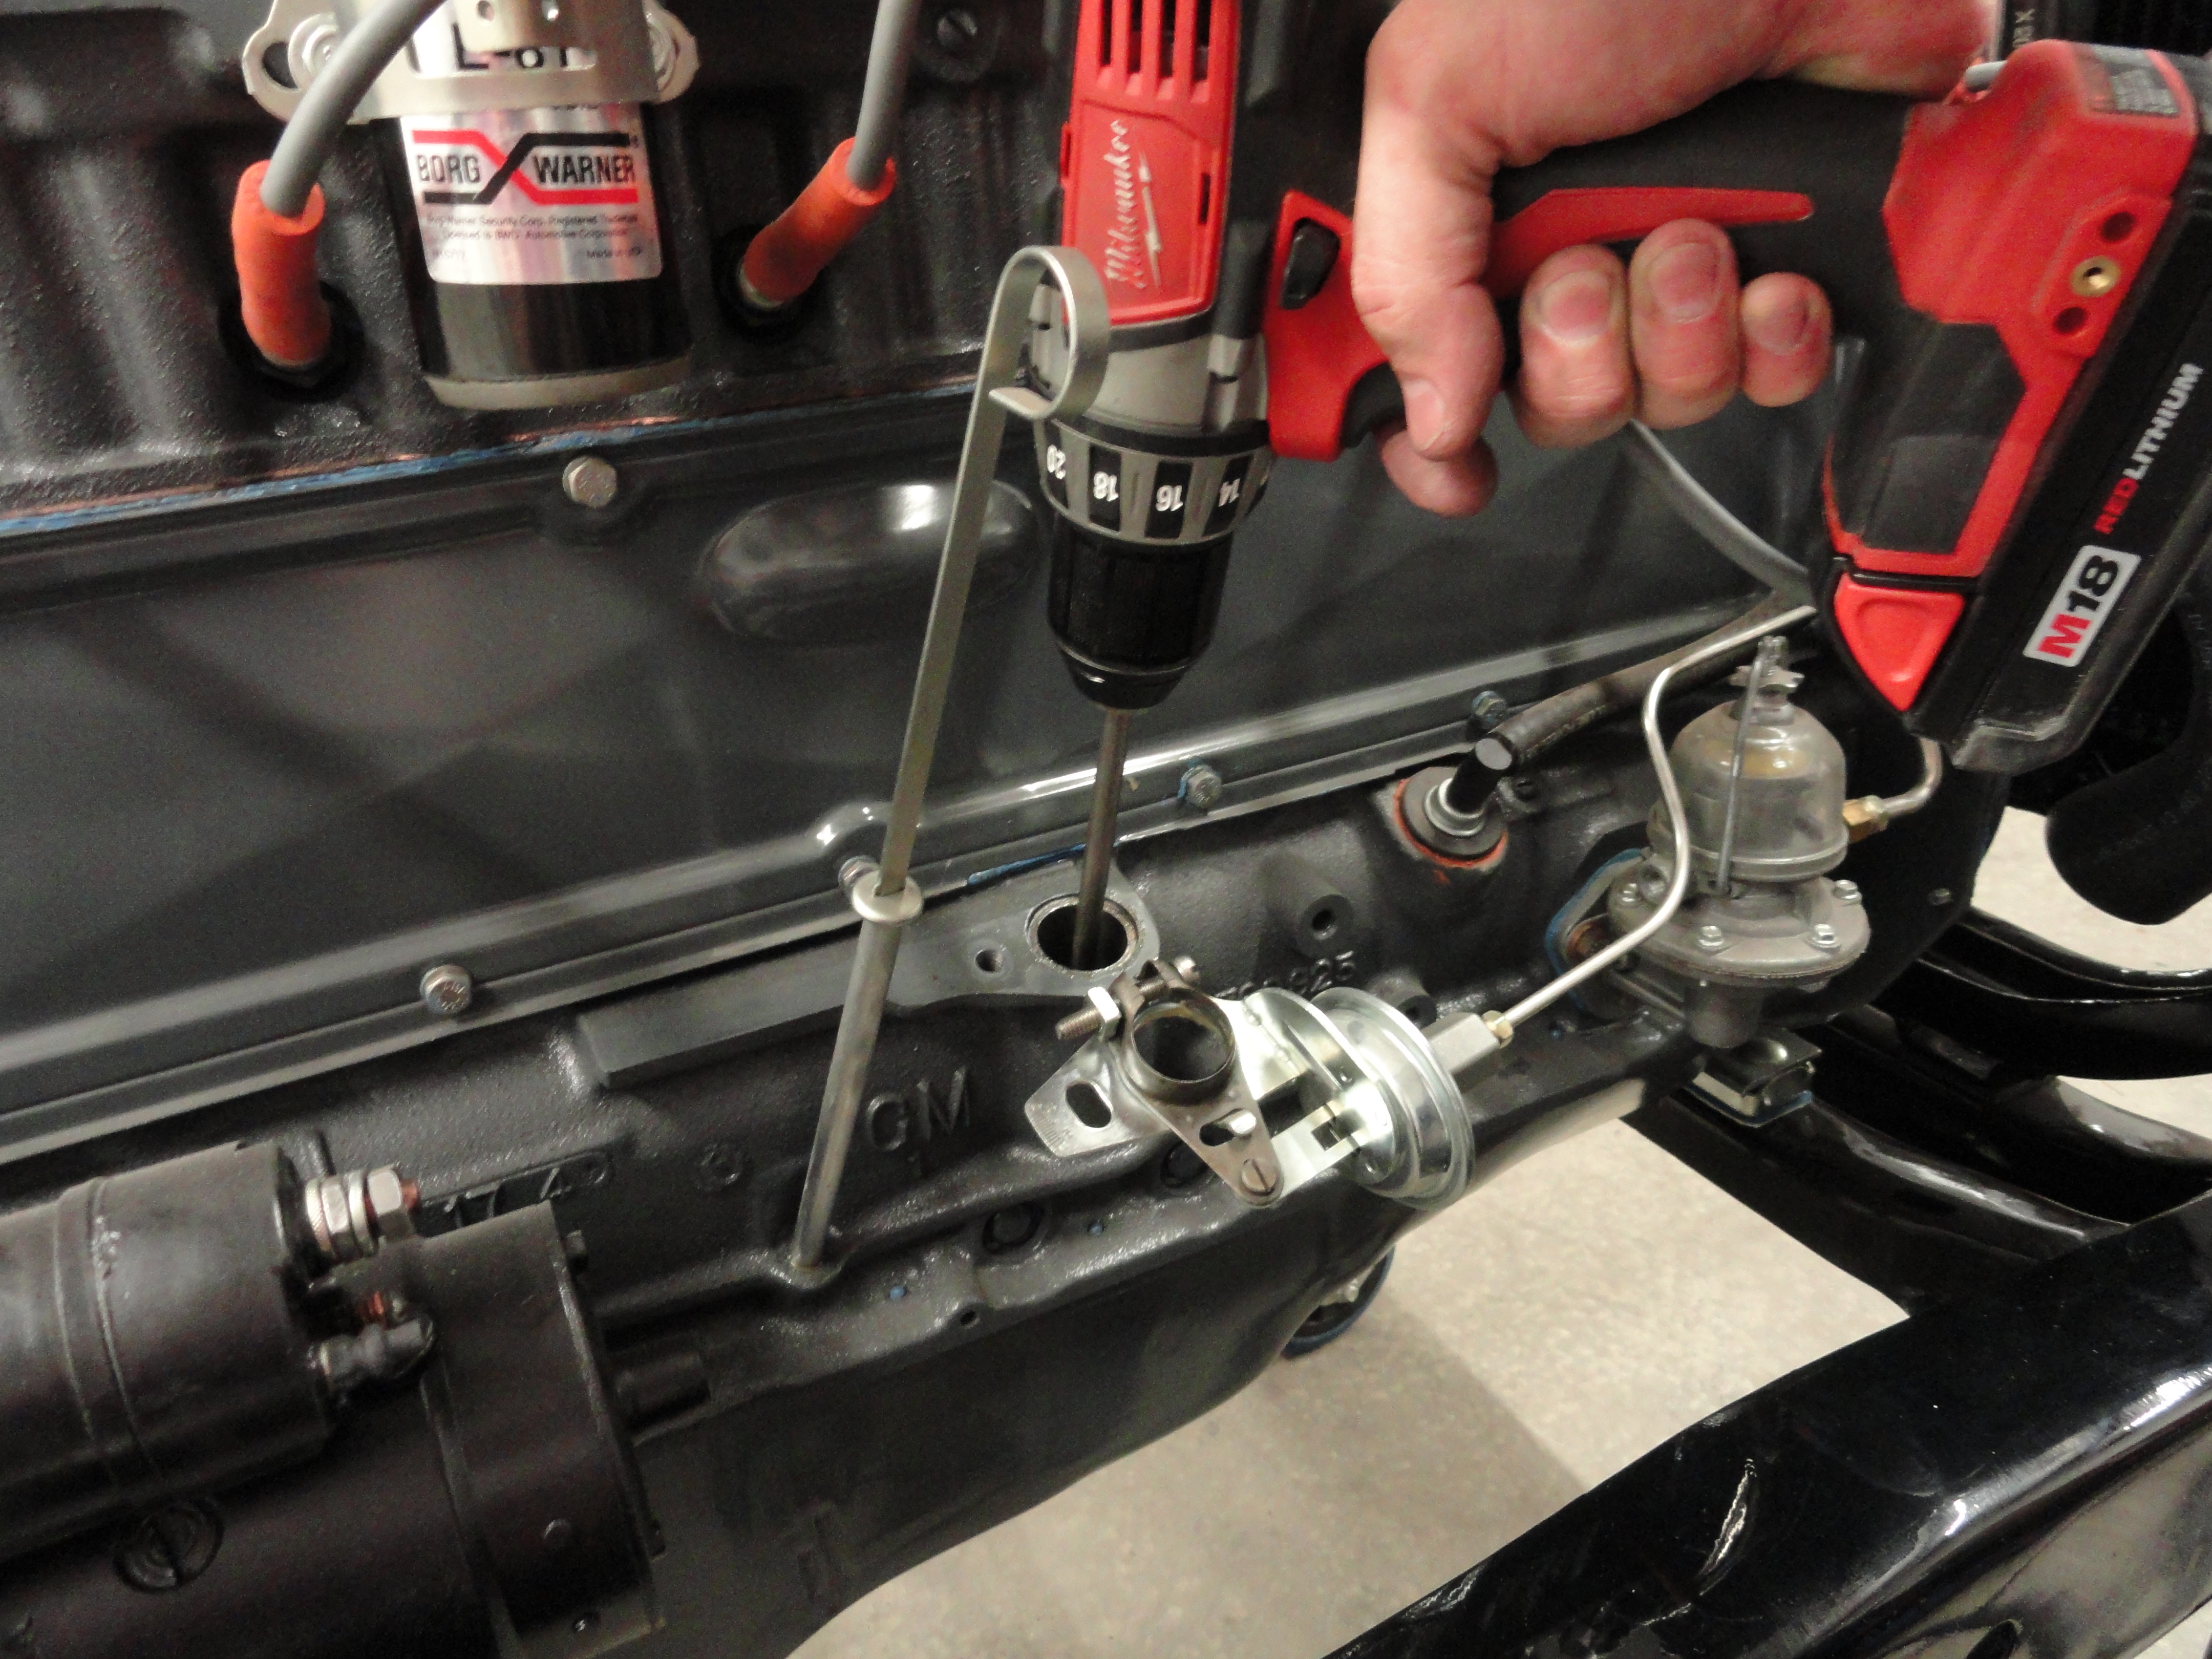
While the distributor is out, check the health of your oil distribution system. Break the handle off a large round shaft screwdriver and chuck it in your high speed
drill motor. Put the Screwdrivers slot into the oil pumps slot at the bottom of the distributor hole. Turn the drill motor at full speed being careful to keep it aligned
down the middle of the hole. Keep it going until you see oil weeping from those rocker arm holes at the top of each rocker. Also, have someone look at your oil pressure
gauge. If you have the drill motor on high speed, the oil pressure will read very close to normal. Now, if the oil just weeps out of the hole, that's normal. If there is NO
oil coming from one or more, then they are clogged and need some cleaning. I have seen that tube that runs all the way across completely clogged.
One more thing concerning rockers... some of you have an auxiliary oil line going from the oil pressure Tee on the driver's side clear around the back (usually) to the
passenger side connected to the center of the head's 1/8" NPT port. This is there because someone got lazy. These engines are prone to clogging on the bottom end, just
below that port on the head. By re-routing the oil, they do not have to address the clog. FIX THE CLOG! There is a head bolt (pull the valve cover) right in front of that
port. Remove it and see if it has a hollow hole through it. Clean it up good or you will miss it. It will be clogged there, OR if not, whether you have a hole in the Head
bolt or not, the clog will be directly below the head bolt. With some .040 gauge stainless safety wire or equivalent, root around in that hole and clear the clog. Sometimes,
just starting the engine with that head bolt out will be enough to blow the clog free. Do not be standing over the hole looking at it when someone starts the engine with
that head bolt out! Put a rag over the hole first or you will be cleaning up your hood and other stuff that got in the way. Now you can remove that auxiliary oil line and
plug the hole and probably remove the Tee.
While the valve cover is off, understand the front of the engine is 3 degrees higher than the back. The ledge that holds the oil in the valve cover is lower than needed
to hold the oil in by itself during operation. This leads to people thinking they have a rear main seal leak when all they have is an improperly installed valve cover gasket.
Get the thicker of the two available gaskets, Fel-Pro VS50190C, then seal the gasket TO THE HEAD, NOT the Cover! You have just created a dam to help hold the oil into an
engine that is installed 3 degrees slanted toward the back! Now when someone says "Pull the Valve Cover", you can just take it off, put it back on again, no issues! Then you
can go to the “Valve Adjustment Procedure” and get that engine perfectly tuned. Also, get some of those oblong washers for your valve cover screws to prevent caving the cover
in from over-tightening. I get them at Speedway Motors (Sku # 92612799).